TTS is short for Text-to-Speech. It is an efficient tool. You only need to type, and then a voice file will be generated automatically. There two types of voice: standard and neural. Standard voice is heard something like a robot, but neural is like a real person.
Nowadays, Amazon AWS, Google Cloud and Microsoft Azure offer TTS service. The form of their services is a technical API. So you may need a tool that helps you to manage the TTS service. This is what CyberBukit TTS can do for you. Please note that CyberBukit TTS cannot do the Text-to-Speech work, the tough work is actually done by AWS, Google Cloud or Microsoft Azure. So you may have extra cost in using TTS (They also offer a free tier if you don't use too much).
You can CyberBukit TTS in these two ways :
1. Manage the TTS service of AWS or Google Cloud
CyberBukit TTS integrates with AWS Polly, Google Cloud Text-to-Speech and Microsoft Azure Service. You need to create accounts on their websites, do some proper configurations. Then you can synthesize text to voice file on CyberBukit TTS. You can also choose how to store your voice file, for example, it can be stored in your local server, AWS S3, or in Wasabi.
2. Run your own TTS SaaS business
CyberBukit TTS also comes with a user management model and a flexible pricing model. You can create multiple users and apply different charging mode. By taking advantage of the powerful cloud computing platform, you can easily start your SaaS business.
2. Steps of configuration
After installation, To make CyberBukit TTS work, you still have several steps to do. Don't worry, it's not too complex. We have tried our best to explain in the simplest way. With our guideline, we believe you may get it worked in 10 minutes.
1. Create an account on AWS, or Google Cloud, or Wasabi
AWS Polly, Google Cloud Text-to-Speech or Microsoft Azure actually does the Text-to-Speech work. So at least you need to create one account of AWS or Google Cloud or Microsoft Azure. AWS offers TTS service(named AWS Polly) and storage service(named AWS S3), Google Cloud and Microsoft Azure only offer TTS service.
Wasabi is optional. It's used to store the TTS voice files. By default, you can store TTS voice files on your server. But if you need to store many files, it's a good choice to use Wasabi as they offer a competitive price.
To start playing with Cyberbukit TTS, we recommend you create an IBM account first, it's the easiest one to get started.
After creating accounts and implementing proper configurations, You need to sync the TTS resource from AWS or Google Cloud. See TTS resource management
3. Set up the pricing model (if necessary)
If you want to run CyberBukit TTS as a SaaS business, you need to set up the pricing model. This article may be helpful.
There are several facts you may need to know about Microsoft Azure Text-to-Speech.
1. Microsoft Azure Text-to-Speech offers 54 languages, 207 voices. Many of them are unique (not offered in AWS or Google).
2. Microsoft Azure offer a free tier: 5 million characters free per month for standard voice, and 0.5 million characters free per month for neural voice. After that, you will be charged $4 per 1M characters for standard voice, $16 per 1M characters for neural voice. This pricing model is absolutely the same as AWS and Google.
3. When you use the Japanese, Chinese, Korean language, one character is counted as two characters for billing. It's clarified here. Accordingly, in the CyberBukit TTS script, when a user chooses these three languages from Microsoft Azure, it will also be counted twice.
2. After sign-in, Click 'Portal' at the right top (besides your email address).
3. Click 'Create a resource', type the word 'Speech' in the search input area, select 'Speech' (It's 'Speech', not 'Speech to Text').
4. Click 'Create', fill in the form: Subscription: Free Trial or any other existing subscriptions in your account Resource group: Create a new group with any name, or select an existing group Location: In order to use all the voices, you can only choose one of the regions as follow: -- Australia East -- Canada Central -- East US -- Central India -- South Central US -- Southeast Asia -- UK South -- West Europe -- West US 2 Name: any legal names Pricing tier: Free F0 (When you get started, you can choose this tier, but when you use a lot and have lots of concurrent, you may need to choose 'Standard S0', which means you will be charged.) Click 'Review + create' Click 'Create'
5. Click 'Go to resource', click 'Click here to manage keys', click 'Show keys', you will see two keys, either of them is ready to use. This is the 'Subscription Key' that you need to copy to the CyberBukit TTS script.
This is the end of the configuration on Microsoft Azure.
Steps of configuration on CyberBukit TTS
Go to TTS Management -> TTS Configuration -> Microsoft Azure TTS Setting, paste the ''Subscription Key' you just created on Microsoft Azure. Select the region, the region should be consistent with the location you choose on Microsoft Azure.
This is the end of the configuration on CyberBukit TTS.
Next step, you need to sync the TTS resource from Microsoft Azure, then you will be ready to use it. See TTS Resource Management
4. Guideline of AWS Polly & S3
AWS offers TTS service(named Polly) and storage service(named S3). There are several facts you may need to know.
1. AWS Polly offers two types of voice, Standard and Neural. The standard voice sounds like a robot, but the price is low. The neural voice sounds like a real person, but the price is a bit higher.
2. AWS offers free tier in the first 12 months, starting from using Polly. The free tier includes 5 million characters per month for standard voice and 1 million characters per month for neural voice.
3. After using up the free tier, you will be billed $4.00 per 1 million characters for standard voice or $16.00 per 1 million characters for neural voice.
5. With up to 3000 characters, you can save the TTS file to your server or S3. For more than 3000 characters and up to 100,000 characters, your TTS file must be saved to S3.
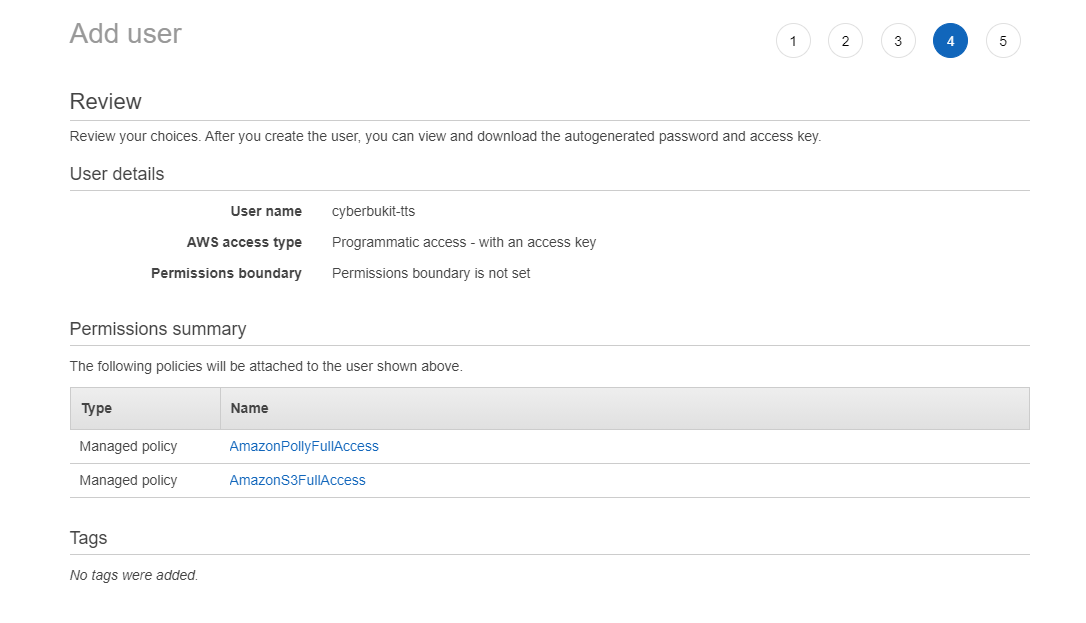
Step 2. Click 'Users', Click 'Add user', fill in a username, tick 'Programmatic access', click 'Next: Permissions'
Step 3: Select 'Attach existing policies directly', tick 'AmazonPollyFullAccess' and 'AmazonS3FullAccess' in the table.
Click 'Next: Tags', Click 'Next: Review', you may see the review page like the following:
Step 4: Click 'Create user'. You will be redirected to the success page and will see the 'Access key ID' and 'Secret access key', make sure you copy or download and save them at a safe place. This is the only time that the secret access keys can be viewed.
3. Create an S3 Bucket (5 steps)
Step 1. Search 'S3', go to Amazon S3
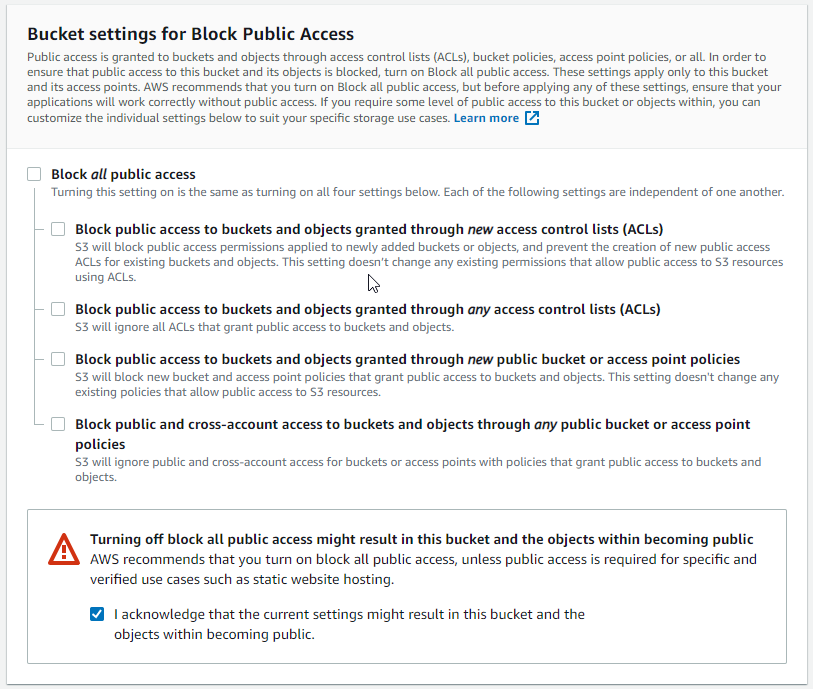
Step 2. Click 'Create bucket', fill in a bucket name, choose the region, untick 'Block all public access' and tick 'I acknowledge that...', for this part, it should like the following:
Step 3. Click 'Create bucket'
Step 4. Go to the bucket you just created, click 'Permissions', scroll to 'Bucket policy' and click 'Edit', paste the following policy JSON code. Please note that 'cyberbukit-tts' at 'Resource' key is the bucket name, it should be replaced with your bucket name that just created. { "Version": "2012-10-17", "Statement": [ { "Sid": "PublicRead", "Effect": "Allow", "Principal": "*", "Action": [ "s3:GetObject", "s3:GetObjectVersion" ], "Resource": "arn:aws:s3:::cyberbukit-tts/*" } ] }
Click 'Save Changes'
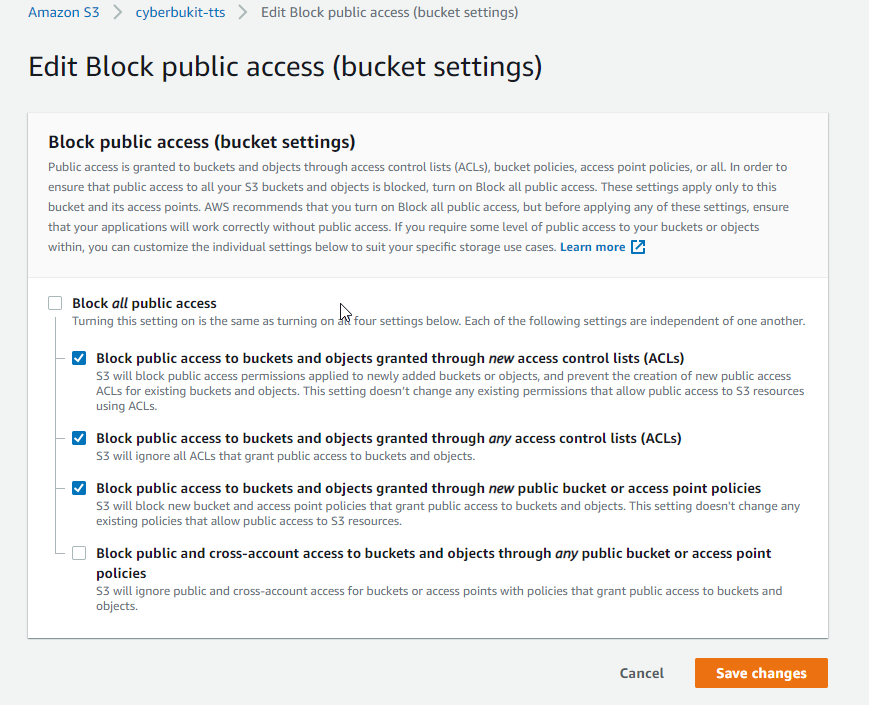
Step 5. Scroll to 'Block public access' part, click 'Edit', tick the first three options and click 'Save changes', it should like the following:
Click 'Save Changes'
This is the end of the configuration on AWS.
Steps of configuration on CyberBukit TTS
According to the guideline from AWS, considering the safety reason, the credentials of AWS service should be saved as a file outside the web directory. Please follow the steps to finish the configuration.
1. Create a new file to save the AWS IAM credentials. It's a pure text file. The content of the file should be: [default] aws_access_key_id = your_aws_access_key_id aws_secret_access_key = your_aws_secret_access_key Replace your_aws_access_key_id and your_aws_secret_access_key with your real credentials (The credentials come from the step of creating an IAM user). Do make sure the '[default]' snippet is not missed. As an example, we save the file named 'aws_credentials', we upload it to '/var/www/config/'. So the 'Configuration File Path' is '/var/www/config/aws_credentials'. Do make sure this directory(/var/www/config/) cannot be visited from the internet. Please note this path(/var/www/config/aws_credentials) is only an example, it varies depending on your server. Overall, it should be the file's absolute path in your server.
2. Sign in as super admin on CyberBukit TTS, go to TTS Management -> TTS Configuration, at 'AWS Polly & S3 Setting (TTS & Storage)' part, fill in like the following:
Please note that the 'Region' and 'Bucket Name' should be absolutely the same as you just filled in and chosen on AWS. Bucket Folder is used to store files in the bucket's sub-folder, if you didn't create a sub-folder on AWS S3, leave it empty.
If you use AWS S3 as the storage solution for the whole site, The voices file generated from AWS Polly will have a two to three seconds' delay. This delay situation also happens when you generate a voice file with the text of more than 3000 characters from AWS Polly no matter what storage solution you use ( This is because AWS forcefully stores the text of more than 3000 characters on AWS S3 ). We have consulted with AWS about this problem, but it seems there is no way to improve this situation.
This is the end of the configuration on CyberBukit TTS.
Before you proceed, please do confirm that your configuration file is stored outside your site's root directory and it can not be visited from the internet.
If you're unsure about this security problem, please submit a ticket, and we'll check for you. Please include your script URL and the value of 'Configuration File Path' (like '/var/www/config/aws_credentials', not the file's content) in the ticket.
Next step, you need to sync TTS resource from AWS Polly, then you will be ready to use. See TTS Resource Management
5. Guideline of Google Cloud Text-to-Speech
There are several facts you may need to know about Google Cloud Text-to-Speech.
1. Google Cloud Text-to-Speech offers two types of voice, Standard and WaveNet. The standard voice sounds like a robot, but the price is low. The WaveNet voice sounds like a real person, but the price is a bit higher.
2. Google Cloud offers 1 million characters per month for free use. After that, you will be billed $4.00 per 1 million characters for standard voice or $16.00 per 1 million characters for WaveNet voice. This is the same as AWS Polly.
3. Google Cloud offers you $300 for the first three months when you create an account.
4. Differ from AWS Polly, no matter how many characters in one text, all TTS voice file will be stored on your server, AWS S3 or Wasabi depending on your setting.
Click 'My First Project', Click 'NEW PROJECT' at the right top. Fill in 'Project name', Click 'CREATE', then select this new project after it's created.
3. Enable the Text-to-Speech API and create credentials
Step 2. Click 'Credentials' on the left side Click 'CREATE CREDENTIALS' at the top Select 'Service account' Fill in the 'Service account name' and 'Service account ID' Click 'DONE'
Step 3. Reload the page and select the account you just created Click 'ADD KEY' Click 'Create new key', select 'JSON' as 'key type' Click 'CREATE' Thus, a file will be automatically downloaded to your local computer. This file is your service credentials.
This is the end of the configuration on Google Cloud.
Steps of configuration on CyberBukit TTS
Considering the safety reason, the Google Cloud credential file should be saved outside the web directory. Please follow the steps to finish the configuration.
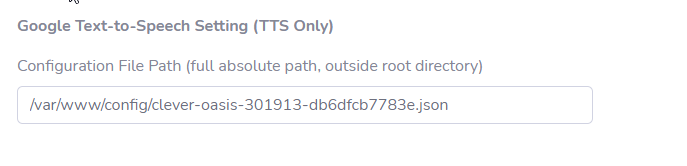
1. As an example, The name of the file we just downloaded is 'clever-oasis-301913-db6dfcb7783e.json', we upload it to '/var/www/config/', So the 'Configuration File Path' is '/var/www/config/clever-oasis-301913-db6dfcb7783e.json'. Do make sure this directory(/var/www/config) cannot be visited from the internet. Please note this path(/var/www/config/clever-oasis-301913-db6dfcb7783e.json) is only an example, it varies depending on your server. Overall, it should be the file's absolute path in your server.
2.Sign in as super admin on CyberBukit TTS, go to TTS Management -> TTS Configuration, at 'Google Text-to-Speech Setting (TTS Only)' part, fill in like the following:
This is the end of the configuration on CyberBukit TTS.
Before you proceed, please do confirm that your configuration file is stored outside your site's root directory and it can not be visited from the internet. The importance of this file is the same as your credit card.
If you're unsure about this security problem, please submit a ticket, and we'll check for you. Please include your script URL and the value of 'Configuration File Path'(like '/var/www/config/google.json', not the file's content) in the ticket.
Next step, you need to sync TTS resource from Google Cloud, then you will be ready to use. See TTS Resource Management
6. Guideline of IBM Cloud TTS
There are several facts you may need to know about IBM Cloud Text-to-Speech.
1. IBM offers 10k free characters each month.
2. The price of IBM TTS is USD 0.02 per thousand characters, which means $20 per million characters (AWS/GCP/Azure is $16 per million characters).
3. Unlike AWS/GCP/Azure, all voices of IBM Cloud are neural and enhanced neural voices, so prices of all voices are identical.
2. Click 'Create resource' at the right-top corner.
3. Search 'text to speech', click the service in the search result, make sure to click 'Text To Speech' instead of 'Speech To Text'
4. Select a location, you can select any location. A good practice is to choose the one near your server's location.
5. Select the 'Lite' plan, it's free. You will need to pay if your usage exceeds the free tier.
6. Click 'Create' at the right-bottom corner, you will be redirected to the resource page.
7. Click 'Manage' on the left sidebar, you will see the API Key and URL. which will be used in the CyberBukit TTS script.
Steps of configuration on CyberBukit TTS
Go to TTS Management -> TTS Configuration -> IBM Cloud TTS Setting, paste the ''API Key' and 'URL' you just created on IBM Cloud.
This is the end of the configuration on CyberBukit TTS.
Next step, you need to sync the TTS resource from IBM Cloud, then you will be ready to use it. See TTS Resource Management
7. Guideline of Wasabi
Wasabi is an online storage solution provider. They offer a competitive pricing model. That's $5.99/month/TB, and they don't charge the data traffic for reasonable use. So when you need to store many files, especially when you are running as a SaaS business, Wasabi is a good choice.
CyberBukit TTS has integrated with Wasabi storage. You can start to use Wasabi in several steps.
Go to 'Access Keys', Click 'CREATE NEW ACCESS KEY', Click 'CREATE', a new access key will prompt, make sure you save the credentials as you won't be able to access after you close the window. Here you are creating an access key for the root user, you can also create for a sub-user, but you need to create a sub-user on Wasabi first.
3. Create a Bucket
Click 'CREATE BUCKET', fill in the Bucket Name, select a region, then click 'CREATE BUCKET'
4. Set up the bucket's public access policies
Go to the bucket you just created, click the gear icon (setting), go to 'POLICIES', paste the following policy JSON code. Please note that 'cyberbukit-tts' at 'Resource' key is the bucket name, it should be replaced with your bucket name that just created. { "Version": "2012-10-17", "Statement": [ { "Sid": "PublicRead", "Effect": "Allow", "Principal": "*", "Action": [ "s3:GetObject", "s3:GetObjectVersion" ], "Resource": "arn:aws:s3:::cyberbukit-tts/*" } ] }
Click 'Save'
Please note if you're in the trial mode, This policy won't take effect as Wasabi bans all public access if you are not a paid user. But you can send them an email explaining what you are going to do and then they will change the setting for you.
This is the end of the configuration on Wasabi.
Steps of configuration on CyberBukit TTS
Wasabi uses AWS SDK, so the setting is almost the same as AWS.
1. Create a new file to save the Wasabi Access Keys credentials. It's a pure text file. The content of the file should be: [default] aws_access_key_id = your_wasabi_access_key_id aws_secret_access_key = your_wasabi_secret_access_key Replace your_wasabi_access_key_id and your_wasabi_secret_access_key with your real credentials (The credentials come from the process of creating an Access Key). As an example, we save the file named 'wasabi_credentials', we upload it to '/var/www/config/'. So the 'Configuration File Path' is '/var/www/config/wasabi_credentials'. Do make sure this directory(/var/www/config/) cannot be visited from the internet. Please note this path(/var/www/config/wasabi_credentials) is only an example, it varies depending on your server. Overall, it should be the file's absolute path in your server.
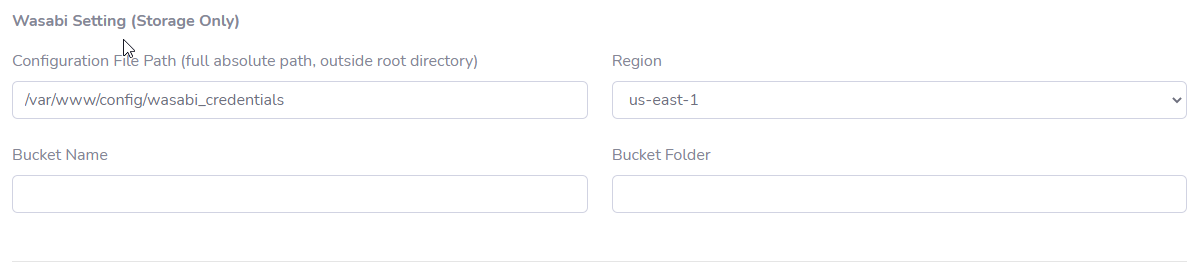
2. Sign in as super admin on CyberBukit TTS, go to TTS Management -> TTS Configuration, set 'Storage Solution' as Wasabi, and at 'Wasabi Setting (Storage Only)' part, fill in like the following:
Please note that the 'Region' and 'Bucket Name' should be absolutely the same as you just filled in and chosen on Wasabi. Bucket Folder is used to store files in the bucket's sub-folder, if you didn't create sub-folder on Wasabi, leave it empty.
This is the end of the configuration on CyberBukit TTS.
Before you proceed, please do confirm that your configuration file is stored outside your site's root directory and it can not be visited from the internet.
If you're unsure about this security problem, please submit a ticket, and we'll check for you. Please include your script URL and the value of 'Configuration File Path'(like '/var/www/config/aws_credentials', not the file's content) in the ticket.
8. TTS resource management
This is the documentation that describes how does the TTS resource management work. The management tool is located at TTS Management -> Voice Resource.
Currently, AWS Polly comes with 29 languages and 64 kinds of voice, some of the voices have the standard and neural voice. Google Cloud Text-to-Speech comes with 42 languages and 138 kinds of voice, Microsoft Azure comes with 54 languages and 207 kinds of voice.
You need to synchronize these resources from AWS, Google Cloud or Microsoft Azure after TTS Configuration.
Click 'Sync Resource From Service Provider' and then select 'Sync From AWS Polly' or 'Sync From Google Text-to-Speech', or 'Sync From Microsoft Azure'. The process is automatic and will be done very quickly, and you will see a list of voices.
This management also comes with a few bulk tools. These help you to enable, disable, delete the resources. Furthermore, you can set accessibility of the resources as Pay-As-You-Go, or as Free. or revoke all accessibility. You can play with it before you start to use it.
Access to a specific voice, you can change the name of the voice, the name will be displayed at the user's Text-to-Speech module. All voices of AWS Polly and Microsft Azure have a real name, but Google's are all named A, B, C, D, so you may need to change.
You can also control the accessibility of each voice according to the user's package and subscription. This feature is useful if you want to run as a SaaS business.
9. How does the pricing model work?
CyberBukit TTS comes with a complex but flexible pricing model. It totally meets different SaaS pricing requirements. You can charge users in many ways.
1. Free service
Free service is not a good idea as you have continuous expenditure to AWS or Google. But if the script is for your own use, then you can set it free.
2. One-time purchase, lifetime use
This is the pricing model we usually see from Facebook or Google ads. Although you will have continuous expenditure, some of the users may not use too much. So maybe finally your income beats your cost. This pricing model depends on whether you have continuous new customers.
You can generally offer some standard(basic) voices for unlimited use and charge in Pay-As-You-Go or subscription model for neural voice.
3. Pay-As-You-Go (PAYG)
PAYG is the most reasonable pricing model. It's the way that AWS and Google are running. Firstly, a user tops up his balance, after that he will be charged for a specific number of characters(depends on your configuration) and then he starts to use. After using up, he will be charged again if his balance is enough. At AWS and Google, they charged $4 for 1 million characters.
4. Package of a specific number of characters
Users can buy a package that includes a specific number of characters. After using up he can buy another package.
5. Subscription of a specific number of characters, or unlimited characters
Users pay monthly, quarterly or yearly for limited or unlimited use. Let's say a user pays $49 for 4 million characters monthly, after using up, he can also use through PAYG or buy a new package. Next month the subscription will be updated and he will have another 4 million characters available.
6. Mix mode
All the pricing model can be mixed together. But it may be confused for uses if it's too complex.
All the pricing models mentioned above are available in CyberBukit TTS.
10. Specific setting for TTS payment package
We tried our best to make the TTS payment package flexible enough. So it might seem to be a bit complex. But we believe it will meet the different requirements of your business.
Here we are going to explain two specific terms of the TTS payment package. Before proceeding, you may need to read this documentation, it's about some generic settings of package.
There are two terms here, 'Characters Limit of Standard Voice' and 'Characters Limit of Neural Voice'. It's used to limit the amount of the characters which can be used within the package.
The characters of neural voice are always 4 times the standard voice. This is because either on AWS or on Google Cloud, the price of neural voice is always 4 times the standard voice. So you only need to set the amount for the standard voice. Once the user uses the neural voice, 4 times of the balance will be deducted accordingly.
2. Bulk Actions
This is used to control the voice's accessibility(whether a user who owns the package can access the voice). It's the bulk action when you are adding or modifying the package, the package will be applied to voice accordingly. However, this value won't be saved in the database as it's action, not setting.
You can check whether the action takes effect after setting, you can see the voice's accessibility as follow.
11. Try-Me Module
The Try-Me module consists of three sub-modules, namely TTS Scenario, Try-it-out and Voice Sample.
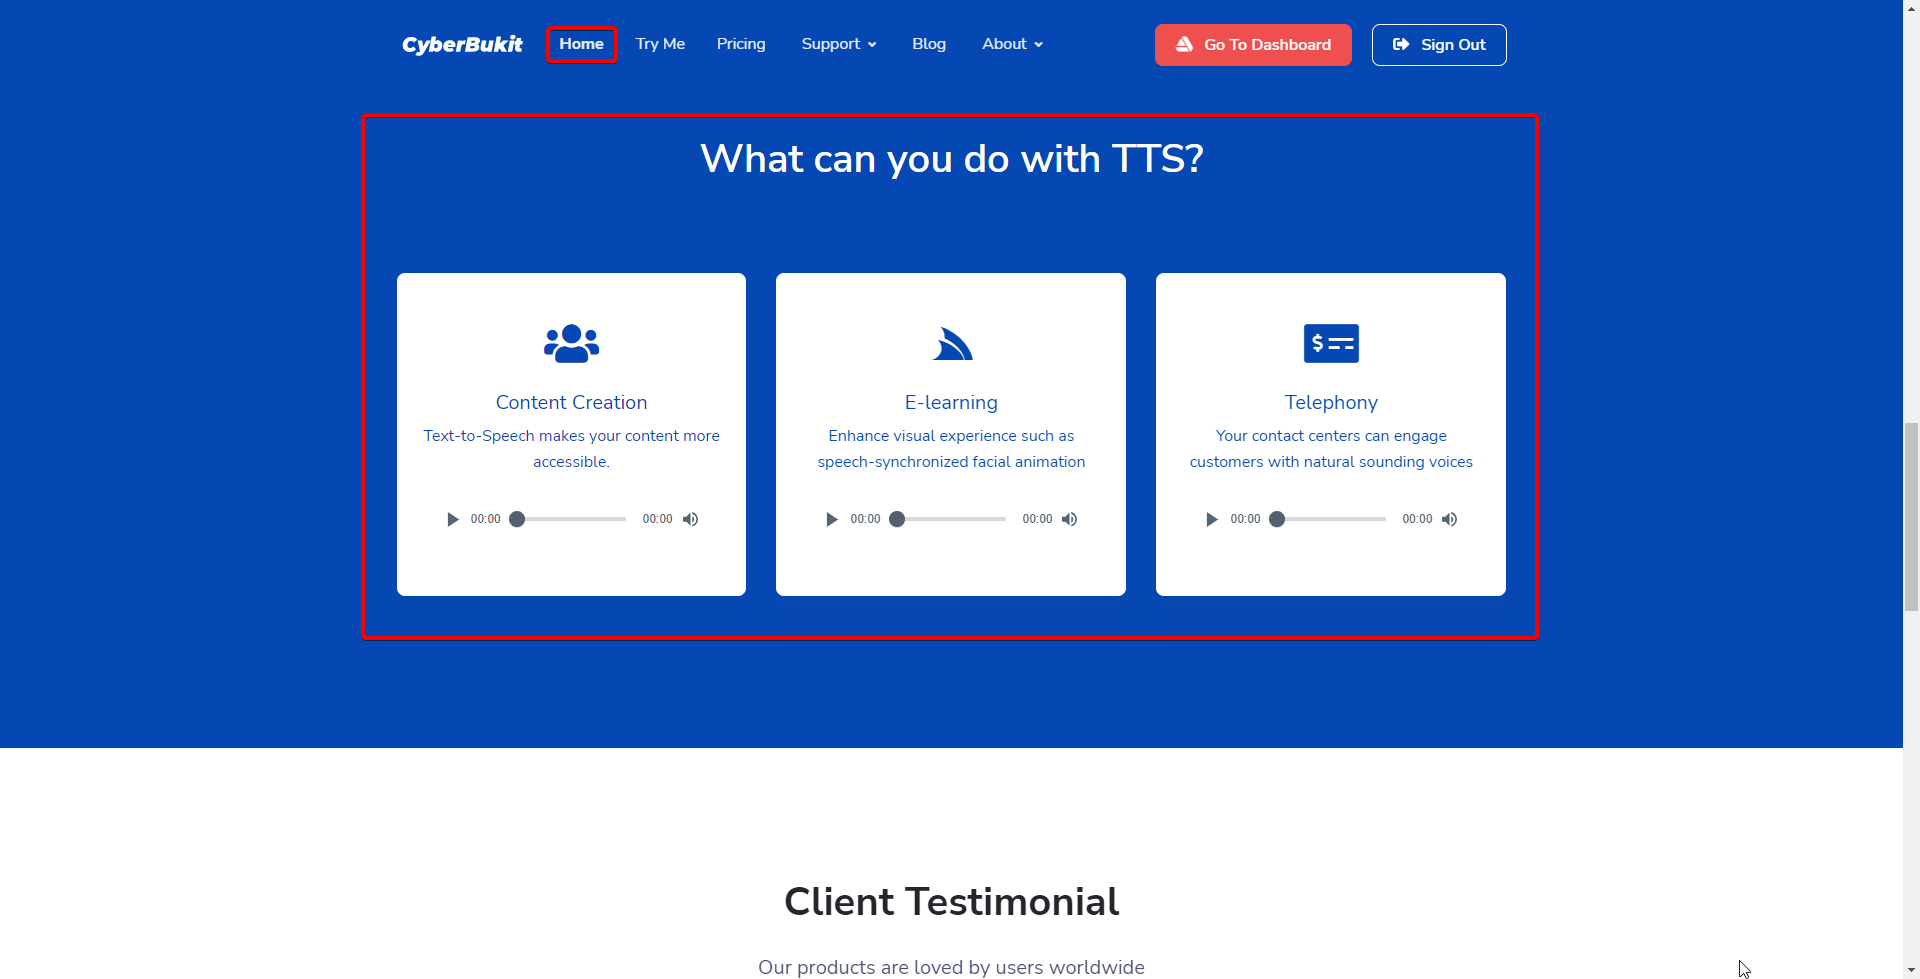
TTS Scenario is used to demonstrate how TTS service is being used in reality, which presents both on the homepage and try-me module.
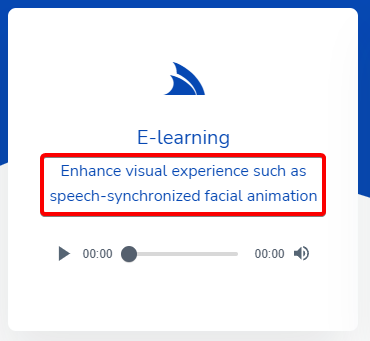
On the homepage, it displays as follows:
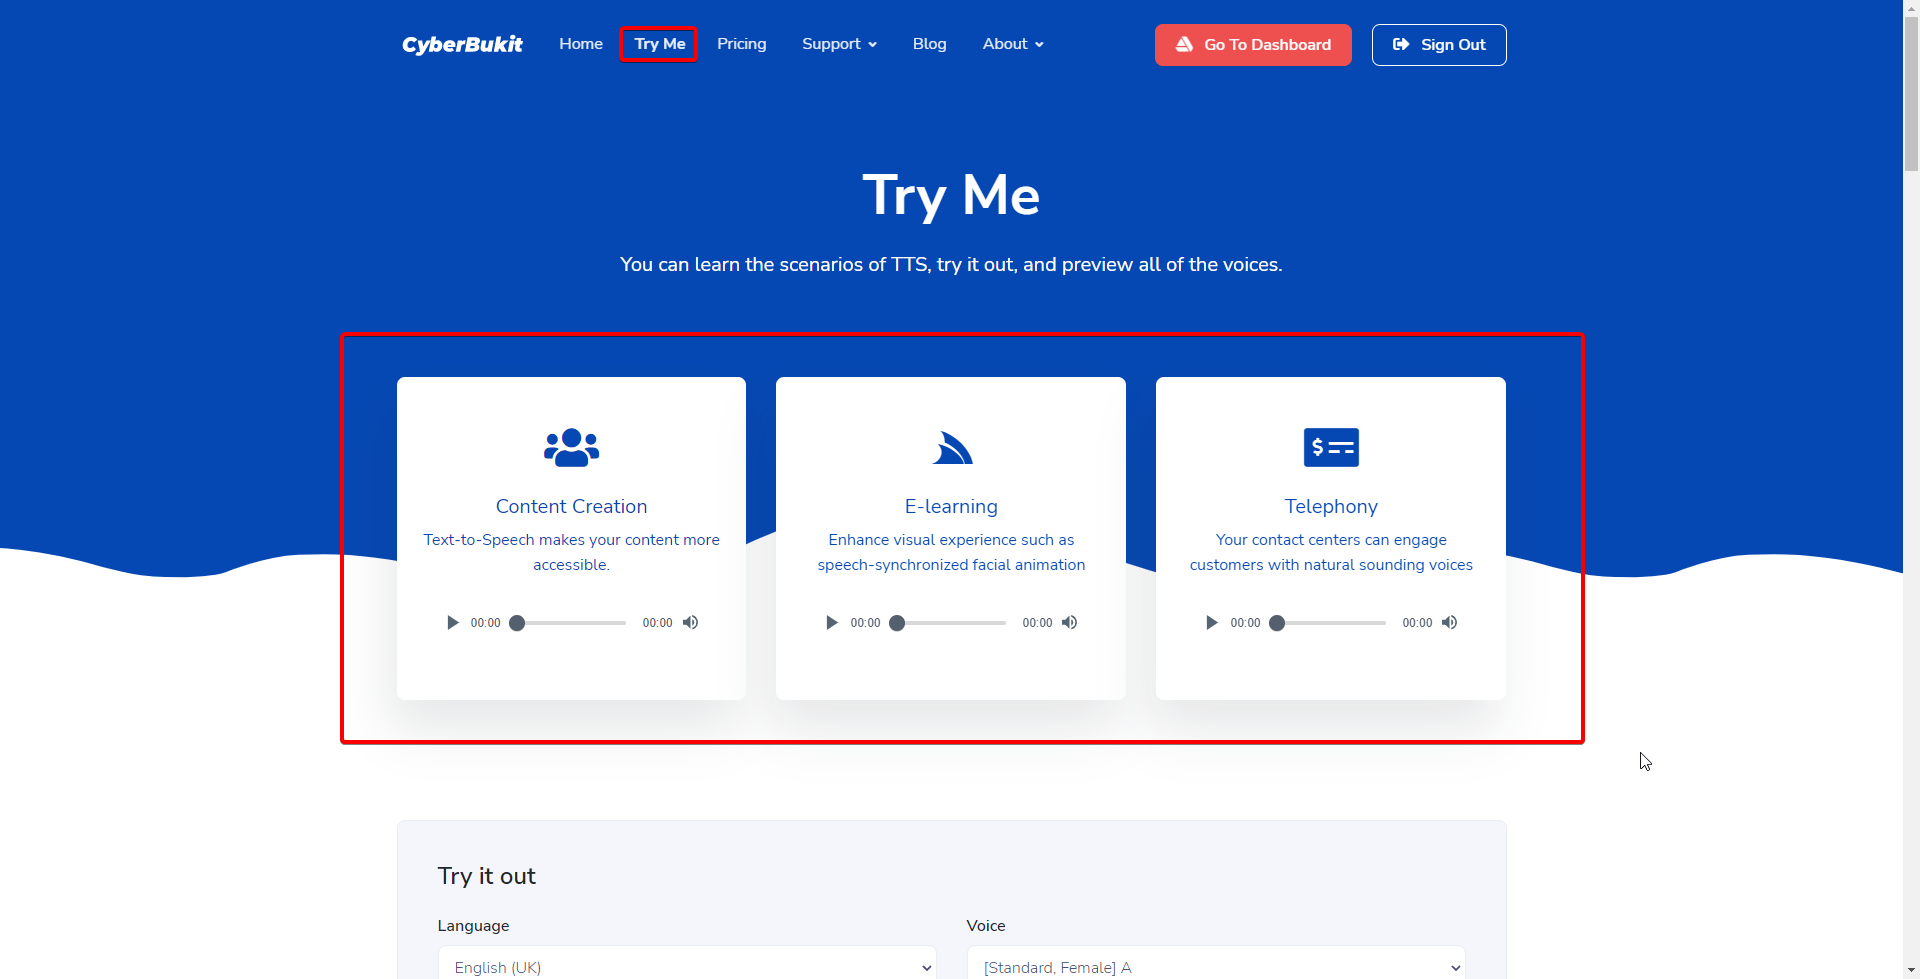
On the Try-Me module, it displays as follows:
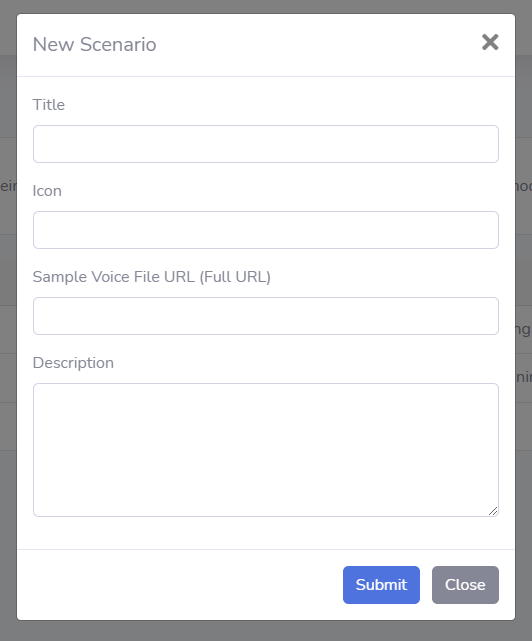
Sign in as super admin, navigate to TTS Management -> TTS Scenario, Click "New Scenario" to add a block.
There are several fields.
1) Title: It displays as the block's title below the icon. This field is compulsory.
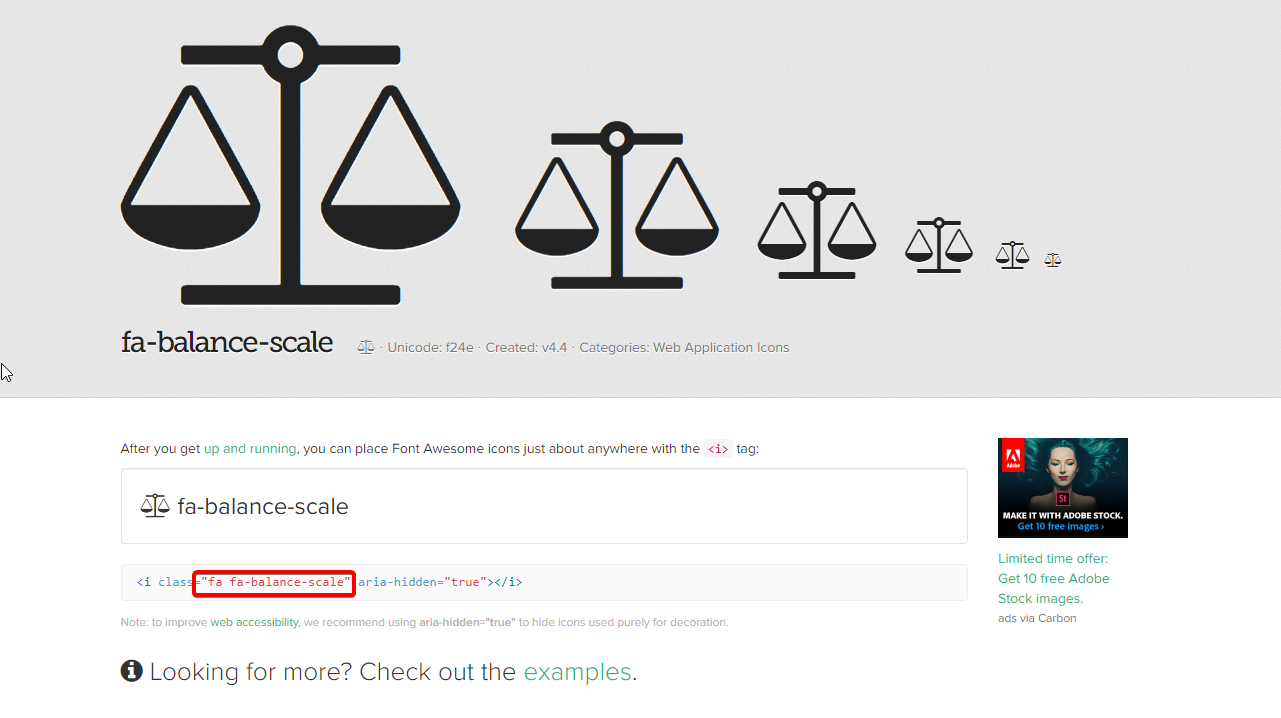
2) Icon: You can choose any preferred icon from https://fontawesome.com/v5.15/icons. Click any preferred icon. You will see the detail as follows. Copy the icon's class name (in the following example, it should be fa fa-balance-scale), and paste it in the Icon field.
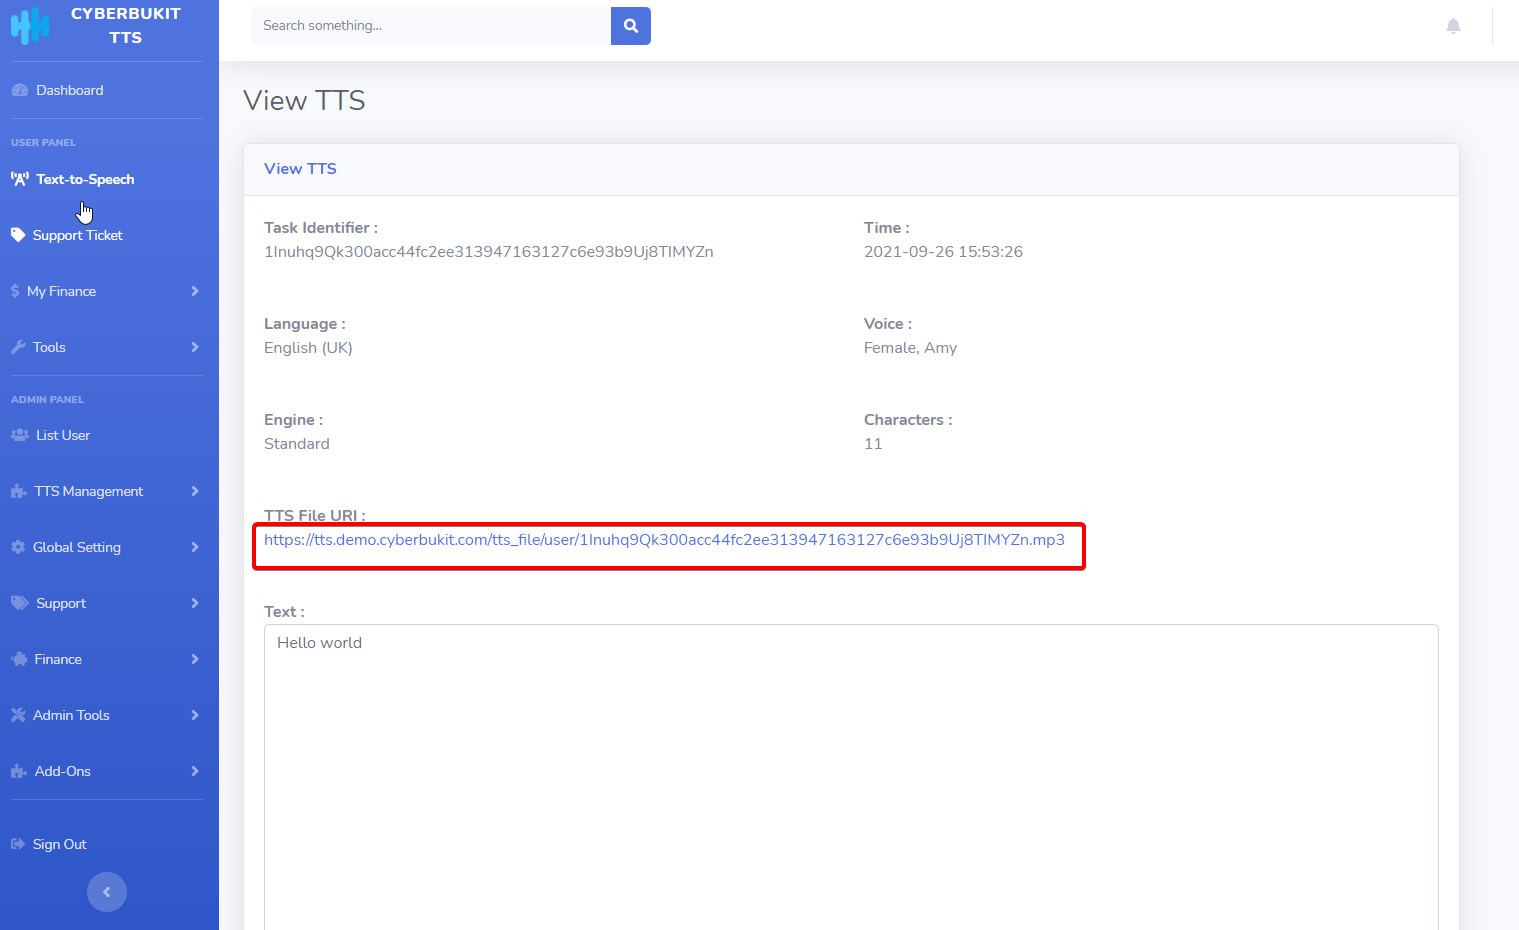
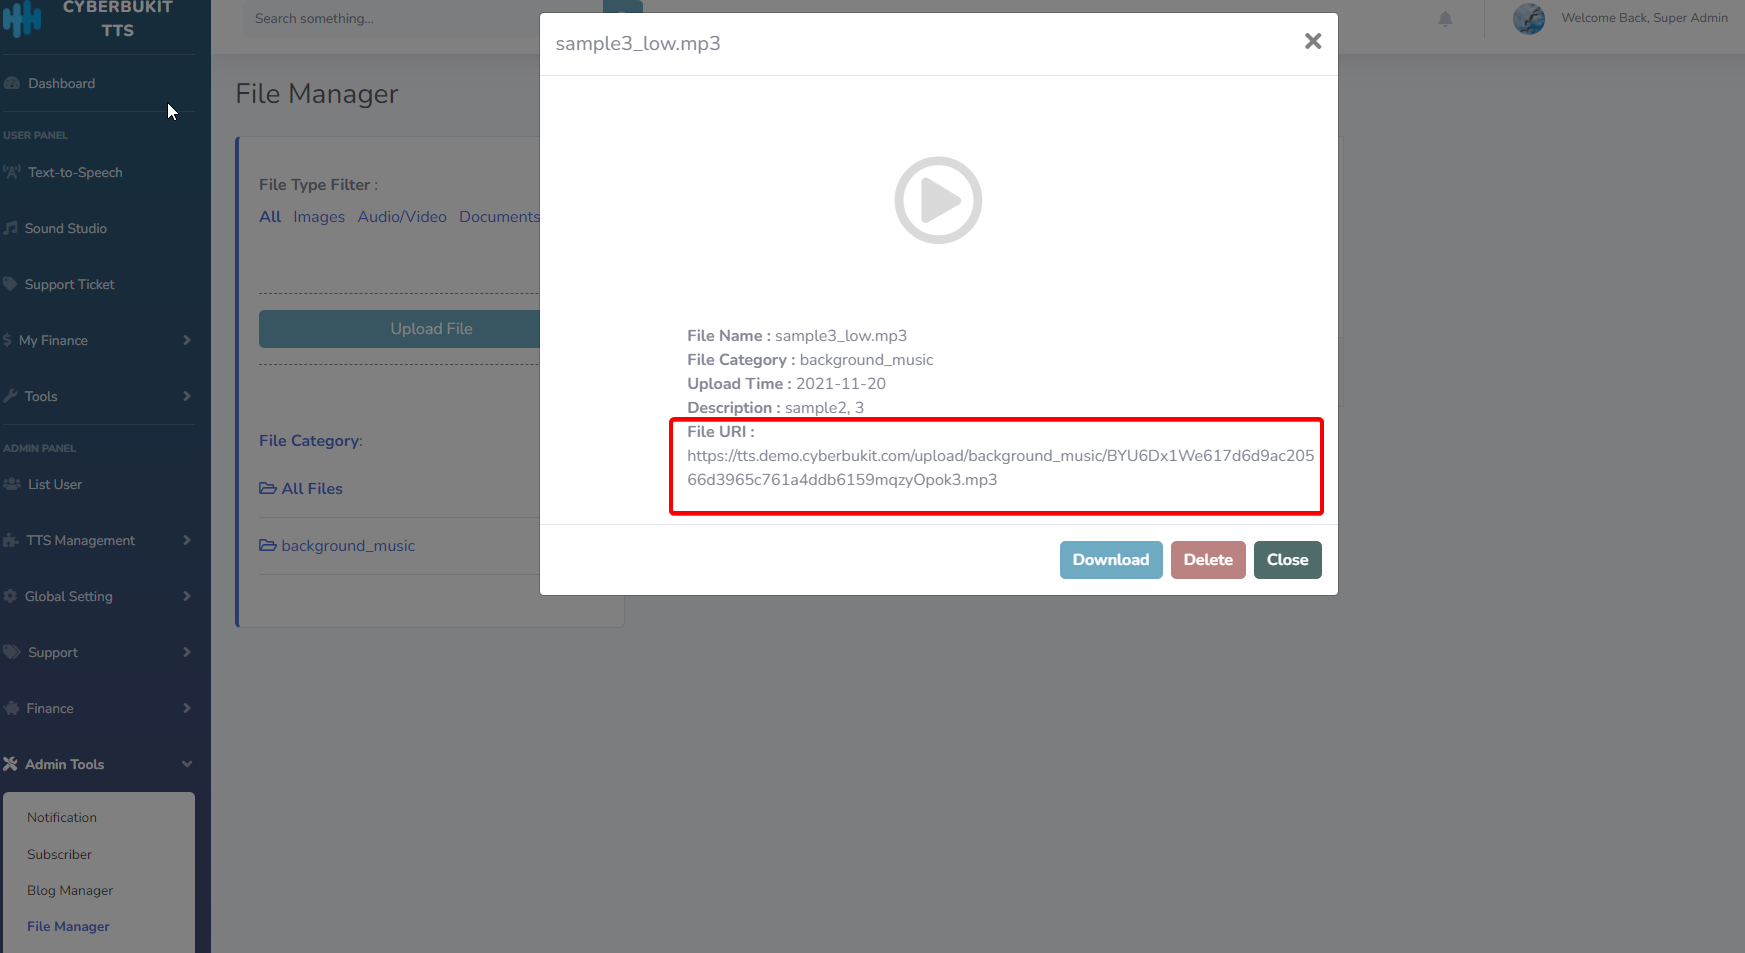
3) Sample Voice File URL: A full URL of the voice file demonstrates how this scenario looks. You can generate the voice file in the TTS script, and copy its URI from the voice file's detail page.
This is not a compulsory field. If it's missed, the player won't be displayed.
4. Description: The brief of this scenario. It displays above the player, below the title.
2. Try-Me Module
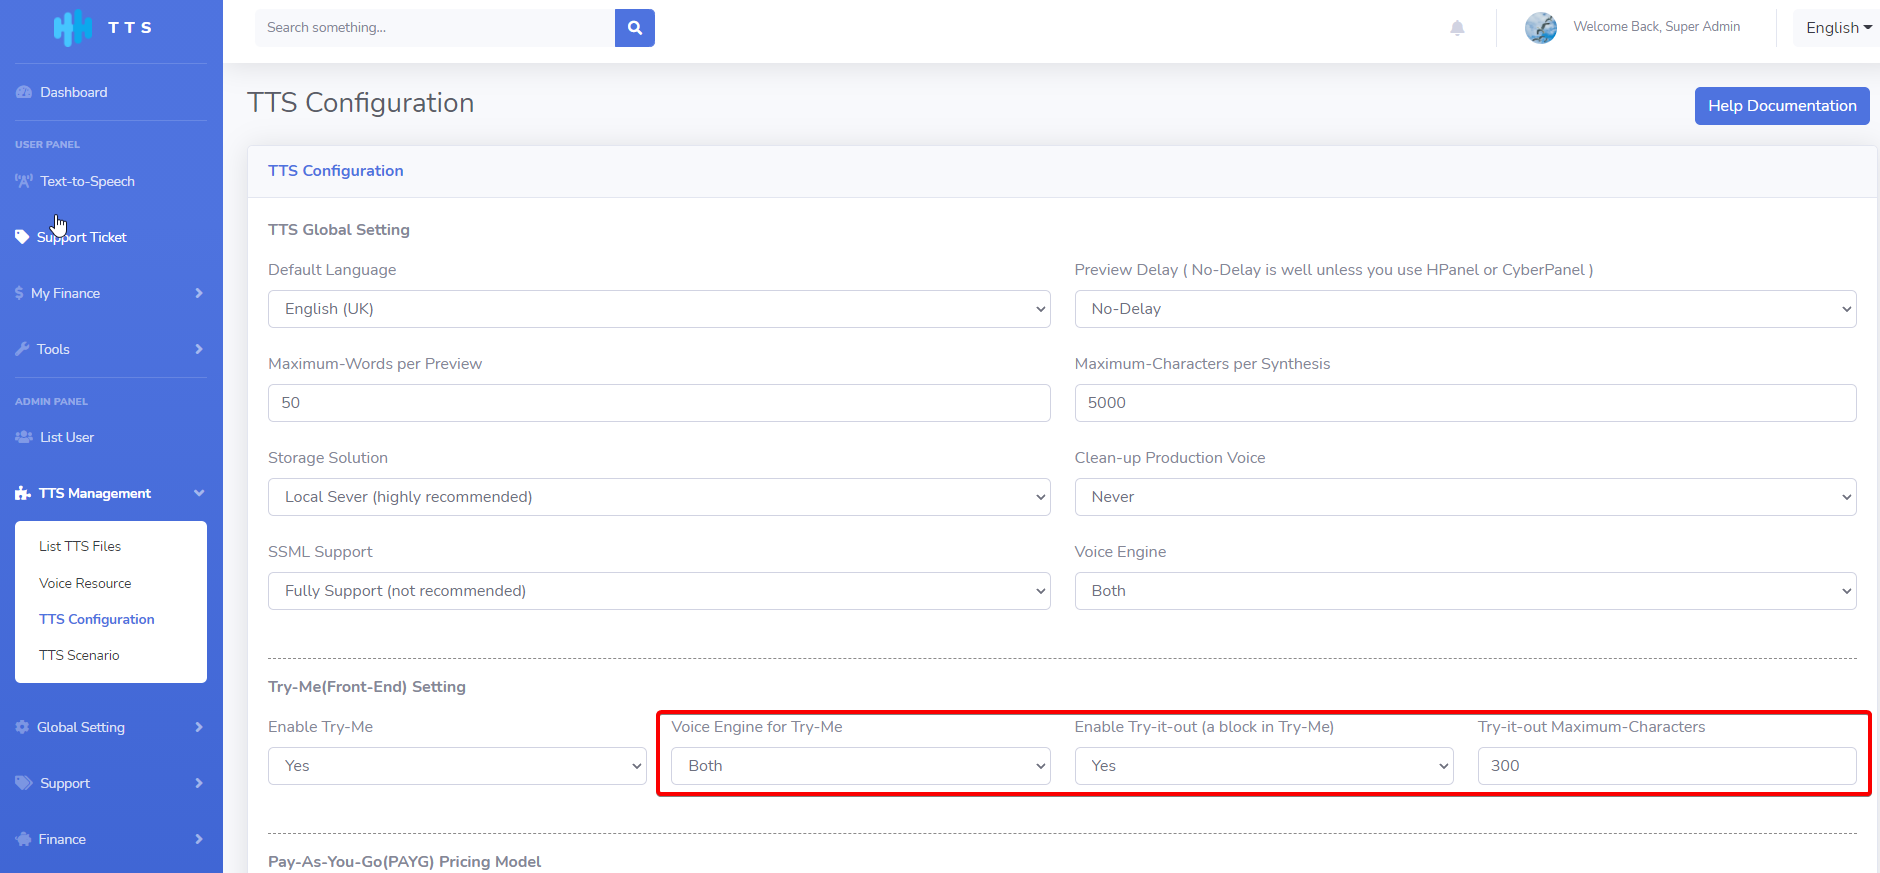
You users can try the TTS service by themselves without sign-in. You can enable/disable this sub-module, set the available type of voices (All Voice/Standard/AI Voice), and limit the characters through TTS Configuration.
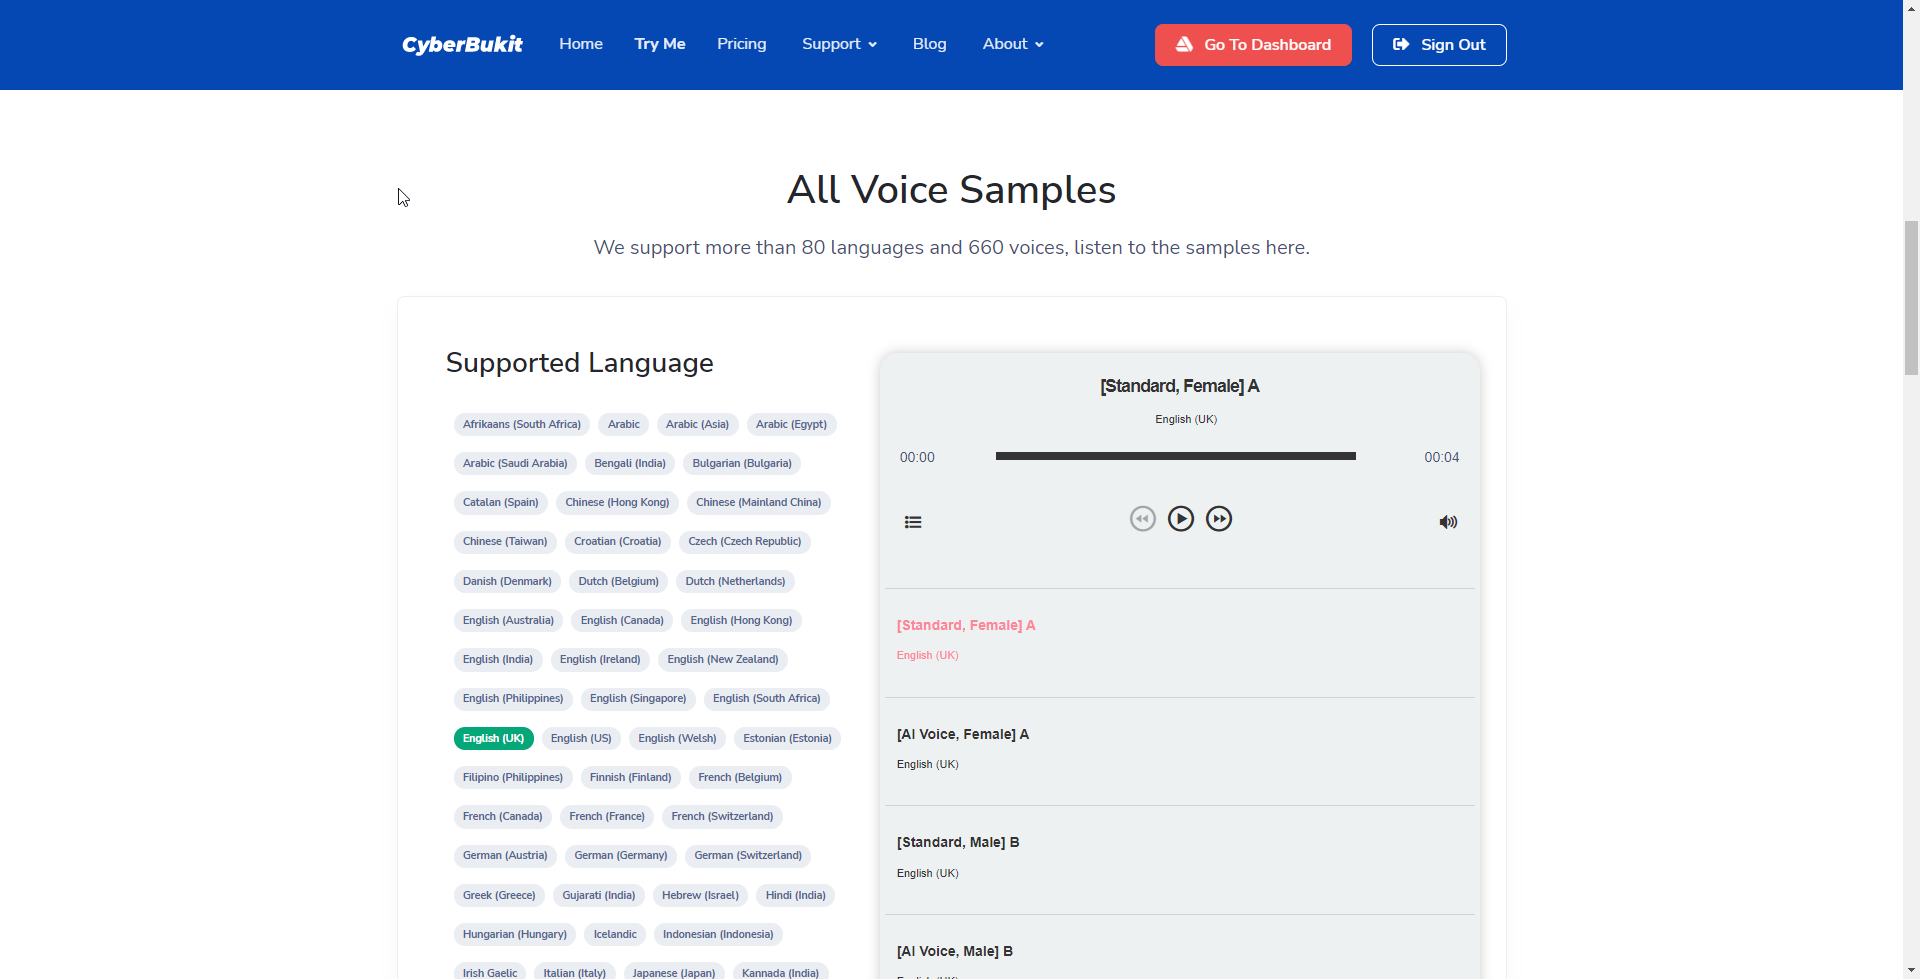
3. Voice Samples
All the available come with a sample voice. Your users can listen to sample voices through this sub-module.
12. Guideline of Sound Studio
Sound Studio is used to merge multiple voice files and add background music to the voice files.
We use FFmpeg to perform the operation. Unfortunately, we didn't find any shared hosting provider supporting the FFmpeg component since it's a resource-consuming feature. But we have found an alternative way to make it work on most shared hosting as long as the provider supports the shell_exec function.
1. Prerequisite
(a) Generally, the shared hosting provider should support the shell_exec function since it is a PHP in-built function, but some of the shared hostings may require additional settings on the hosting panel. Please ask them for help (simply ask them how to enable the shell_exec function) in case needed.
(b) Set executable permission(755) on two files as follows: vendor/ffmpeg/ffmpeg vendor/ffmpeg/ffprobe If you are using cPanel, you can navigate to the two files respectively, and the permission should be as follows:
2. Upload your background music file
Background music files are not compulsory for the Sound Studio. If you don't provide your users with the background music feature, you don't need to upload any files. And your users are still available to use the Sound Studio to merge their files.
To get the best performance, we highly recommend you convert your background music file to the format of mp3.
There are 3 steps(add a folder for storage, upload the music files, add them as background music) to upload the background music.
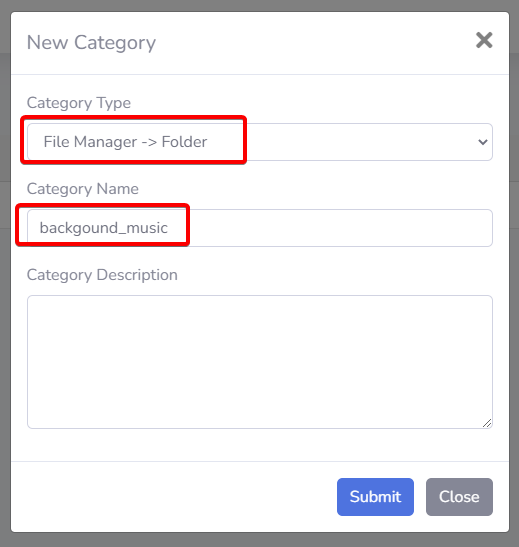
(1) Create a folder specifically for storing the background music file. Sign in as super admin, navigate to Global Setting -> Category Management, create a new category as follows:
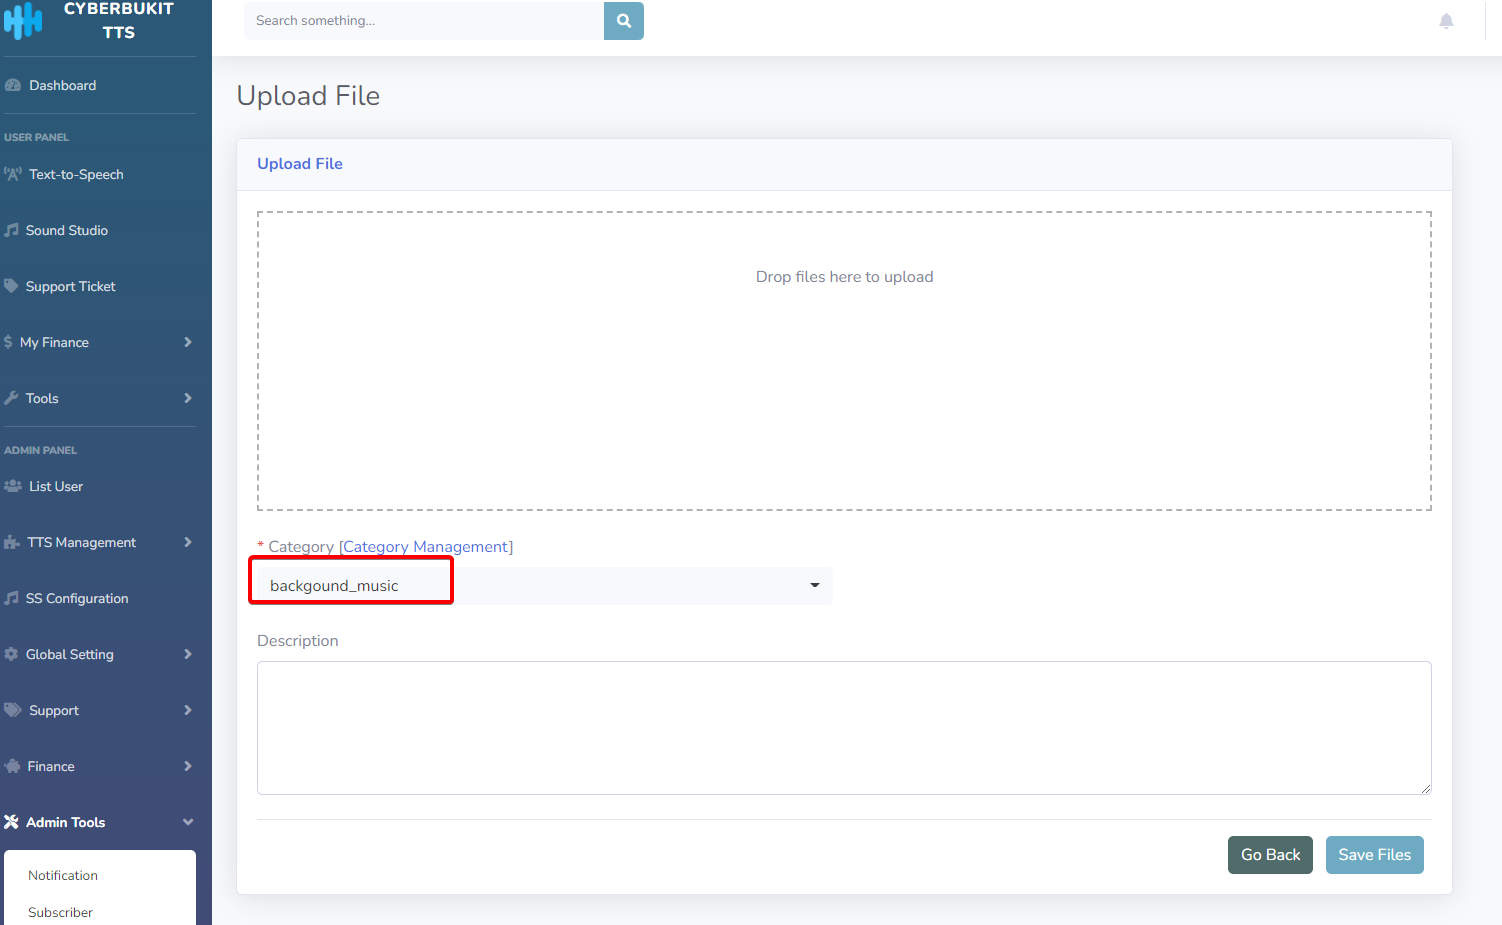
(2) Upload all your background music files to this folder. Navigate to Admin Tools -> File Manager, upload the files and choose the folder that was just created.
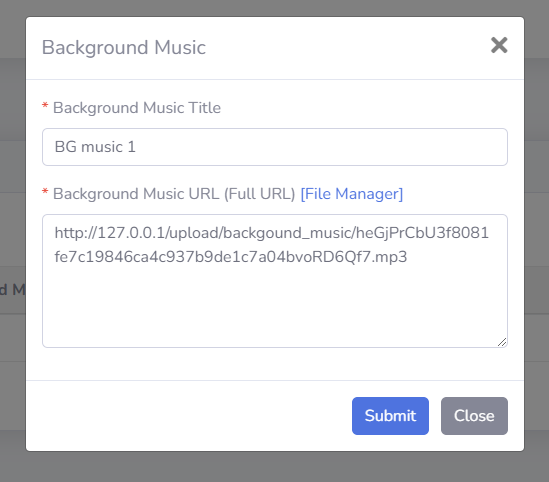
(3) Add the background music. Navigate to SS Configuration, Add the music's title, which will be shown in the background music list. And add the music file's URL.
As for the Background Music's full URL, it's in the File Manager as follows:
3. For upgrade users only
If you upgrade from v1.2.0 to v1.2.1, the FFmpeg is not included in the upgrade package since it's too large. What you need to do is to download it manually, then extract it, and then upload the whole folder(ffmpeg) to the vendor folder, which is in the root directory.